- The handle is sturdy, the number of knobs is up to 50,000 times without breaking
- Patented spring pressure indication, pointer reading accuracy error is 1.5
- The high-quality rubber meter tube reduces the pool leakage caused by corrosion by 98%
Manifold Gauge Set With Recycling Aluminum Valve

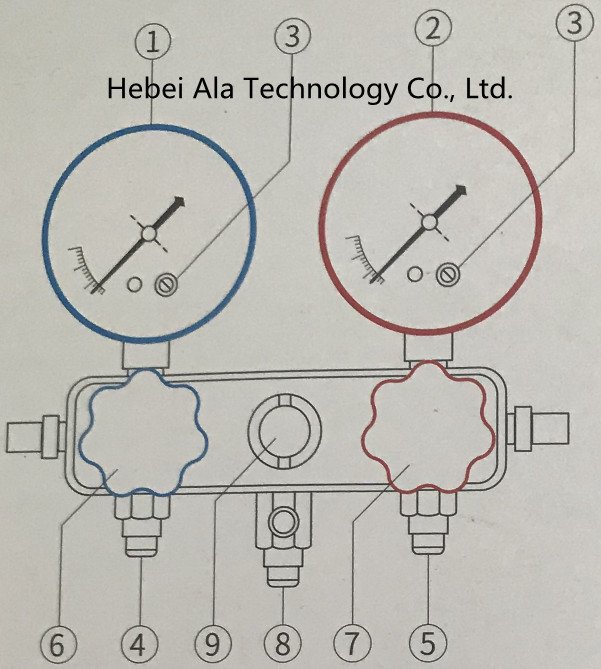
Schematic diagram of product appearance structure
- Low pressure meter (blue)
- High pressure meter (red)
- Zero adjustment screw
- Low voltage interface
- High voltage interface
- Low pressure valve (blue)
- High pressure valve (red)
- Vacuum or refrigerant interface
- Sight liquid window
1、Product features
The double valve adopts a unique dynamic indication invention, and the fresh feeding is 1.5 grade; the internal connection of the feeding series tools adopts the most popular environmental protection material in the world, and the life of the sealing ring can provide more than 8 years;
The double meter valve connecting hose adopts the high-tech technology of the highest quality rubber raw material, and the corrosion guide tank using the meter tube material leaks 98%. It is the product of choice to protect producers;
The twist handle of the tool is made of the strongest special material. When the factory conducts the twist test in the laboratory of professional institutions, the maximum number of twists is up to 50,000 without breaking.
2、 the scope of use
Suitable for refrigeration maintenance (refrigerants include CFC, HCFH, HFC, etc.), (such as: R12/R22/R134a/R404a/410a, etc.) industry pumping and liquid operations.
Purpose: It is used for the refrigerant filling of the air conditioning system and displays the real-time system pressure. The main components are hook, low pressure meter-blue, high pressure meter-red, low pressure interface, high pressure interface, filling port, high and low pressure handle (optional accessories, high pressure hose-three-color tube, high and low pressure quick connector).
3、Operation guide
Before connecting to the system, please check whether the pointer of the pressure gauge is at the zero position. Otherwise, open the cover and adjust the screw ③ to adjust the pointer to the zero position.
●Connect with the system
Close the low-pressure valve first ⑥, high-pressure valve ⑦;
The interface ④ is connected with the blue tube and (low-pressure quick connector), and then connected to the system low pressure and locked;
The interface ⑤ is connected with the red tube and (high-pressure quick connector), and then connected to the system high pressure and locked;
The interface ⑧ is connected with the yellow tube and the vacuum pump and locked;
●System vacuum
Note: This step must be carried out under the normal pressure of the system, otherwise the pressure of the system should be relieved first
After completing the above connection, turn on the vacuum pump;
Open the low-pressure valve (blue) ⑥, the high-pressure valve (red) ⑦, and then (open the high and low-pressure quick connector), at this time the system begins to vacuum;
After a certain period of time (10-30min), check whether the system is completely vacuumed. If there is no vacuum, check the leaks of the system and re-evacuate after repairing;
At the same time, close the high and low-pressure valves ⑥⑦, and finally close the vacuum pump.
●The system is filled with refrigerant
Disconnect the yellow tube from the vacuum pump, and then connect it to the refrigerant bottle. Tighten it, first open the refrigerant bottle (position in the front), open the valve core on the watch group, and exhaust the air in the yellow tube;
Invert the refrigerant bottle, open the low-pressure valve ⑥, high-pressure valve] ⑦ add refrigerant;
After reaching the specified amount (according to the filling amount provided by each system manufacturer), close the high-pressure valve⑦, low-pressure valve⑥, and at the same time correct the refrigerant bottle;
After turning on the system for a period of trial operation (about 5-10min), check the system pressure and temperature;
If the refrigerant is insufficient, but the refrigerant bottle upright, slowly open the low-pressure valve ⑥, (at this time strictly prohibit opening the high-pressure valve ⑦) add a proper amount of gas refrigerant;
If it is too high, close the cylinder, slowly open the high-pressure valve, discharge an appropriate amount of refrigerant from the valve core of the meter group (at this time, pay attention to the sprayed refrigerant hurting people), then close the high-pressure valve, and re-test; as above, reciprocate until normal. . After the operation is normal, close the refrigerant bottle and valves ⑥, ⑦, and then disconnect the (high and low-pressure quick connector) from the system (at this time, pay attention to high temperature and hot hands);
●Use and maintenance
High-pressure valve]⑦detection, low-pressure valve[ ]⑥detection, misuse is strictly prohibited to prevent damage to the pressure gauge; it is strictly forbidden to use working fluids that do not match the indications of the gauge group;
Close the high and low-pressure valves] ⑥, ⑦ do not use excessive force;
After use, loosen the valve, keep it properly, shock-proof and drop-proof;
Please read this manual carefully, or operate under the guidance of professionals.
4、Safety warning
To avoid personal injury, please read carefully and follow the instructions in the instruction manual.
When working with refrigerants, please wear goggles and protective gloves;
Do not directly contact the refrigerant to prevent personal injury caused by the refrigerant;
Do not directly touch the watch group to the high-temperature part of the machine to prevent the high temperature from damaging the watch tube and causing refrigerant leakage; when using the watch group, do not aim the sight glass at the crowd to prevent accidents;
5、Common faults and troubleshooting
| Failure phenomenon | Alabama Park | Method of exclusion |
| Sight window leaks | Loose or damaged glass ring | Lock or replace the glass to replace the meter head |
| The pointer does not indicate | Damaged spring tube and movement | Replace the meter head |
| Air leakage at the handle knob | A damaged rubber ring at the handle knob | Replace the rubber ring |
| Air leakage at the twist of the pipe joint | The gauge tube gasket is damaged | Replace the gasket |
| The meter tube expands, blisters, bursts open | Table tube corrosion of overpressure | Replace the meter tube |
| High and low-pressure joints leak | Damaged rubber ring | Replace the rubber ring |
6、Warranty
Due to the quality of the product itself, it is guaranteed within one year from the date of delivery. The warranty scope is as follows:
After the manufacturer’s inspection department] has been inspected and confirmed, the product is found to have manufacturing defects;
Disassembled products that have not been repaired privately;
Use the products that follow the “Instruction Manual” in the correct way. All warranty services should be carried out within the warranty period.
Statement: The manufacturer does not bear any additional costs other than product failures, including loss of working hours, loss of refrigerant, contaminated refrigerant, and unapproved transportation or labor costs.


